Deteksi Pengunjung

IP

Create Compound Frames in InDesign CS5

By using the pathfinder panel within InDesign CS5 it is possible to create a compound frame that can be used to import an image to create a unique effect. Find out more about Compound Frames at the jump.


Step 1

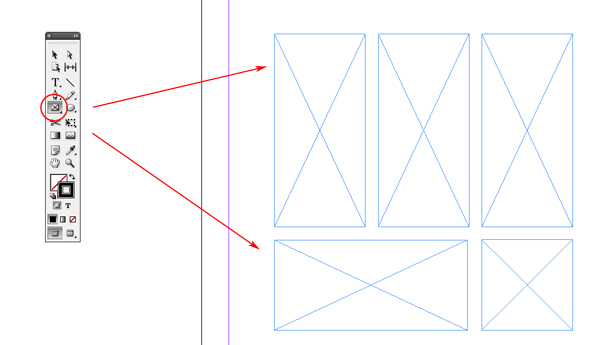
Start by creating a number of frames to work with. Select the Rectangle Frame tool from the Tool box or use Shortcut = F, click and drag to create the frames.

Step 2

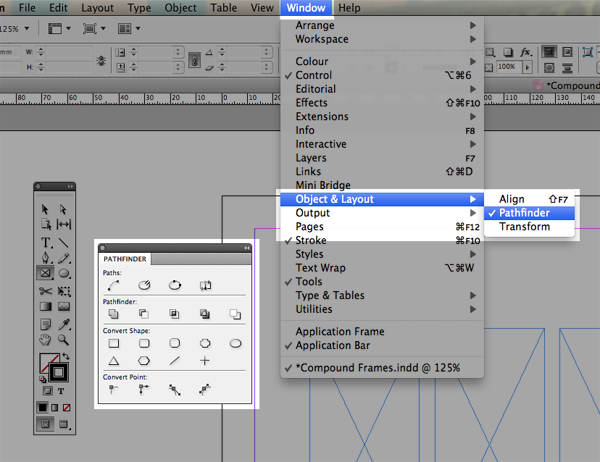
Go to Window > Object and Layout > Pathfinder. You will be presented with a floating panel.

Step 3

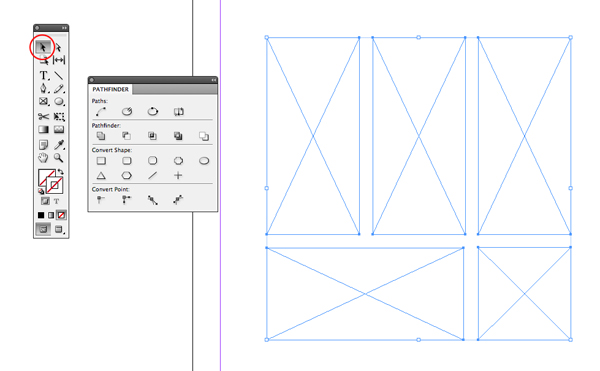
Using the Selection Tool, Shortcut = V, select the frames you want to compound.

Step 4

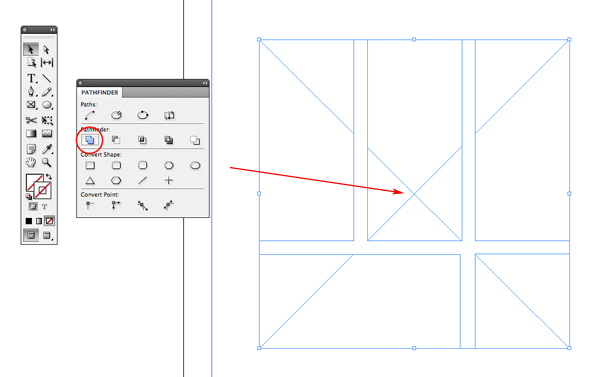
On the pathfinder panel locate the Add button and press it to compound the frame. The frames will lose their diagonal lines and one set of diagonal lines will span across the compounded frames.

Step 5

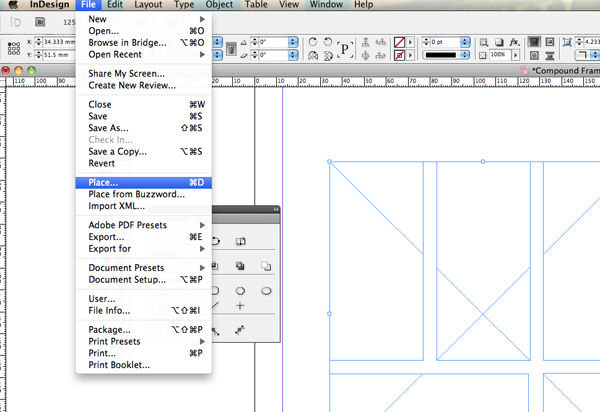
Leaving the frame selected place an image by going to File > Place or by using shortcut Command + D. Select an image to insert and press OK.

Step 6

To change the position of the imported image select the Direct Selection Tool and click inside the frame. A hand cursor will appear, use this to click and drag the image.

Image from morguefile.com

Step 7

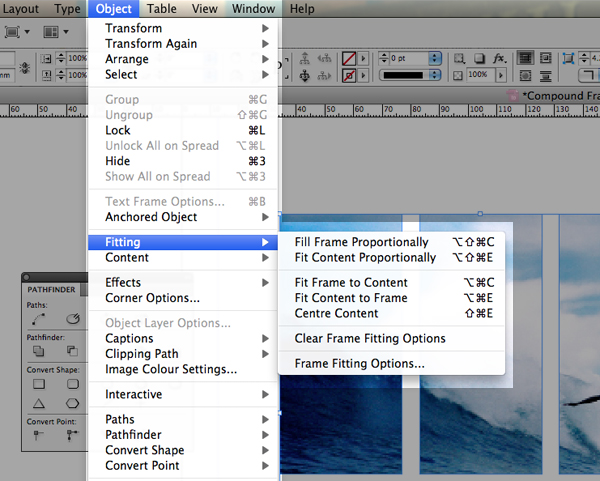
Additionally the image can be modified by using the Fitting Options by going to Object > Fitting.

Step 8

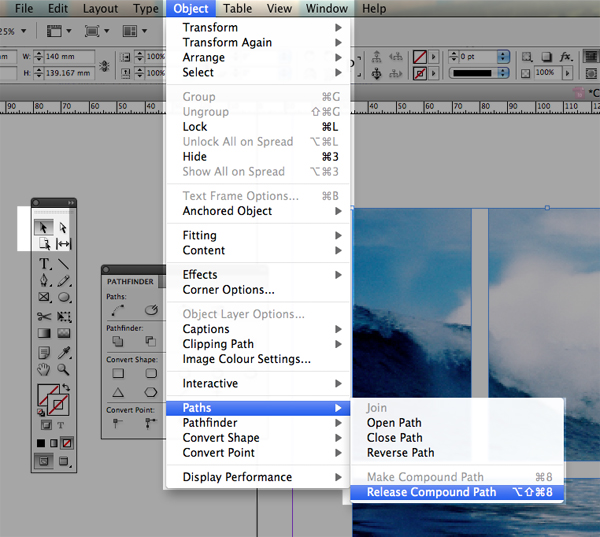
To release a compound frame, select the Selection Tool, click once on the compound frame and go to Object > Paths > Release Compound Path.
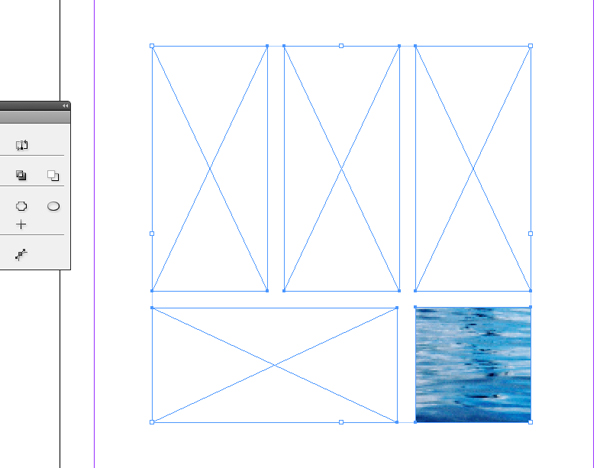
Once released the image will be contained in one frame and the rest will be left empty.

Conclusion

Try this technique in your next project to add a new visual effect to your layouts and designs. It works great when more than one compound frame is used in a single design. Have fun!
[ ... ]

Ditemukan Bug Pada Barcode di CorelDraw X6

Pembahasan Coreldraw X6 kali ini mengenai fitur insert barcode. Bug / kekurangan fitur barcode pada Coreldraw X6 ini kami temukan saat hendak membuka dokumen yang telah disimpan menggunakan Coreldraw X5. Kami pun mengulangi untuk membuat hal yang sama, pertama kami membuat sebuah barcode pada Coreldraw X5. Satu barcode tetap pada posisi horisontal sedangkan barcode satunya lagi kami putar dengan posisi vertikal.
Barcode menggunakan Coreldraw X5
Lalu kami simpan file coreldraw ini dalam versi X5 dengan nama barcode.cdr.
Menggunakan Coreldraw X6, kami buka kembali file barcode.cdr tadi, dan ternyata memang terdapat bug/kekurangan dalam Coreldraw X6 ini. Barcode yang dalam posisi horisontal, posisinya tidak dapat diputar sama sekali. Sedangkan barcode yang telah diputar menggunakan Coreldraw X5, posisinya tidak dapat diputar, barcode hancur (menjadi terbalik dari seharusnya).
Bug barcode pada Coreldraw X6
Demikianlah satu dari beberapa bug yang kami temukan dalam Coreldraw X6 ini, kami sarankan untuk Anda yang bekerja menggunakan Coreldraw X5 terutama di percetakan, jangan menggunakan Coreldraw X6 pada pekerjaan Anda supaya dokumen yang sudah dibuat tidak menjadi rusak, kecuali bila Anda ingin menggunakan Coreldraw X6 untuk membuat dokumen yang baru.
[ ... ]

Coreldraw X6 Memilih Objek dengan Shortcut

Tutorial Coreldraw X6 kali ini kita akan membahas sebuah fitur pada Coreldraw X6 yang belum diketahui oleh sebagian besar pemakainya yaitu kemudahan memilih object dengan menggunakan shortcut. Untuk menjelajari fitur ini, kita coba dulu membuat beberapa objek sebagai percobaan :D
Tutorial Coreldraw X6 - Kemudahan memilih objek dengan shortcut
Di atas kita sudah membuat 5 lingkaran dengan bayangannya, kelima lingkaran kami beri huruf a,b,c,d,e untuk memudahkan penjelasan tutorial ini.
Kita mulai, klik pada lingkaran a lalu tekan ctrl+1 (angka diatas huruf-huruf ya, bukan angka num). Klik pada lingkaran b lalu tekan ctrl+2, dan seterusnya sampai lingkaran e tekan ctrl+5. Lalu klik bayangan hitam di bawah lingkaran seluruhnya lalu tekan ctrl+6.
Cara di atas berfungsi untuk membuat shortcut untuk memilih objek. Penggunaannya, sekarang silahkan pilih lingkaran a dengan menekan tombol angka 1 (cukup angka saja, tidak pake ctrl). Begitu juga jika ingin memilih bayangannya cukup tekan angka 6. Cara ini dimaksudkan untuk memudahkan kita dalam memilih objek yang sangat kompleks dalam mengerjakan desain dengan Coreldraw X6. Silahkan dipraktekkan agar bisa memahami tutorial Coreldraw X6 ini.
Hiii... ketemu lagi dengan saya yang kali ini mau berbagi pengetahuan lagi. oke pada postingan ini kita akan belajar bagaimana membuat banner yang bagus dan indah dari CorelDraw X6. mungkin tutorial ini banyak telah ditulis oleh beberapa blog lainnya, tapi saya akan coba me review kembali tapi bukan dengan CorelDraw X5, melainkan dengan CorelDRAW X6 yang baru :). tidak biasanya pada CorelDraw X6 ini terdapar banyak pilhan wallpaper yang bagus-bagus dan tidak ada di Coreldraw X5. untuk memperjelas mari sama-sama kita melangkah maju tapi tidak mundur di pemubuatannya: 1. Mula-mula buat lahh kotak yang akan di jadikan byground untuk banner. seperti gambar dibawah ini. 2. Kalau sudah mari kita menuju menu yang terdapar pada kiri sidebar kerja, yang pasti teman-teman sudah pada tahu letaknya. lebih kurang seperti gambar dibawah ini. 3. tahap selanjutnya nanti akan muncul table yang seperti ini. nahhh lihat aja tuu, banyak wallpaper yang bagus yang bisa jadi pilihan masing-masing kita sesuai kebutuhan. 5. Finally jadi dehh... berikut beberapa contoh yang saya buat. Tidak sulitkan ? sebenarnya ini tidak ada bedanya dengan corel-corel sebelumnya, hanya saja yang membuat beda itu macam-macam koleksi wallpaper-nya yang begitu banyak dan indah. so... yang belum beralih ke CorelDraw X6, jangan ragu-ragu karena banyak kejutan baru disana. yang mau punya CorelDraw X6 tanpa TRIAL bisa comment disini nanti saya akan bagi tips untuk dapat yang aslinya :) oke.. sekian dulu tutorial kali ini, semoga bermanfaat, And.. Be Creative !!!

Read more at: http://www.falyadesign.com/2012/04/tutorial-coreldraw-x6-cara-membuat.html
Copyright sharingfile4u.blogspot.com Under Common Share Alike Atribution
[ ... ]

Tutorial CorelDraw X6 – Color Harmony

Tutorial Coreldraw X6 kali ini kita akan membahas cara yang mudah dan tentunya sangat menghemat waktu untuk mengubah warna yang benar-benar kompleks pada suatu objek. Kita akan menggunakan contoh pada objek kupu-kupu yang bisa Anda download di sini.
Bisa dilihat bahwa kupu-kupu tersebut memiliki banyak warna, kita akan coba mengubah kupu-kupu ini menjadi warna yang lain. Pada Coreldraw X6 diperkenalkan fitur baru yaitu Color Harmony, fitur ini bisa kita akses melalui Window > Docker > Color Styles atau dengan menekan tombol ctrl+F6.
Coreldraw X6 - Color Harmony
Pertama kita drag kupu-kupu tadi ke kotak bertuliskan Drag Here to add color Style. Seluruh warna yang ada pada objek tadi akan masuk ke dalam Color Style tersebut. Kita pilih warna yang akan kita ubah, kali ini kita coba untuk memilih seluruh warna. Tidak perlu klik satu per satu untuk memilih seluruh warna, cukup dengan klik warna yang pertama lalu tekan tombol shift dan klik warna yang terakhir, seluruh warna akan terpilih.
Coreldraw X6 - Color Harmony
Setelah seluruh warna terpilih, klik pada tombol New Color Harmony. Seluruh warna tadi akan masuk ke dalam Harmony Folder. Tinggal mainkan warna yang ada pada lingkaran warna di bawahnya untuk mengubah warna keseluruhan.
Coreldraw X6 - Color Style
Sebagai contoh, kita ubah kupu-kupunya menjadi warna biru, kita putar salah satu lingkaran dalam tabel warna diatas menjadi seperti di bawah ini
Tutorial Coreldraw X6 - Color Style
Coreldraw X6 - Color Style
Jika ingin mengubah satu atau beberapa warna juga bisa, tinggal kita klik warna yang ingin kita ubah dalam Folder Harmony tadi. Ini hanyalah satu dari beberapa fitur baru Coreldraw X6, fitur-fitur yang lain akan kami jelaskan kemudian. Silahkan dipraktekkan agar lebih mudah mencerna tutorial Coreldraw X6 ini.
[ ... ]

Design a Stylish Poster mixed with displacement effect in Photoshop CS5

Final Image Preview

Design a Stylish Poster mixed with displacement effect in Adobe Photoshop CS5
Inspired from Demi Lovato by Jeno Panganiban.
Start working by creating a new document (Ctrl+N) in Adobe Photoshop CS5 with the size 1280px by 1024px (RGB color mode) at a resolution of 300 pixels/inch. Use the Paint Bucket Tool (G) to fill with white color the new background layer.
Find a stock photo with a model represented on it, I used this photo from deviantart. I would like to thank the author of this photo, or if you prefer, you can substitute similar image of your own.
Design a Stylish Poster mixed with displacement effect in Adobe Photoshop CS5
Remove the background using your favorite tools like Pen Tool (P), Magic Wand Tool (W), Magnetic Lasso (L) or even a simple Filter>Extract and insert it on a new layer in our main document.
Design a Stylish Poster mixed with displacement effect in Adobe Photoshop CS5
Click on Add a layer style icon from bottom part of the Layers panel and select Drop Shadow style for model’s layer.
Design a Stylish Poster mixed with displacement effect in Adobe Photoshop CS5
We’ve got the next result:
Design a Stylish Poster mixed with displacement effect in Adobe Photoshop CS5
Create a new layer and make a selection, applying the Rectangular Marquee Tool (M). Place this layer under the girl’s one.
Design a Stylish Poster mixed with displacement effect in Adobe Photoshop CS5
Select the Soft Mechanical brush from Brush Tool (B).
Design a Stylish Poster mixed with displacement effect in Adobe Photoshop CS5
Use this brush to paint the top edges of the selection using #E694FF color as shown .
Design a Stylish Poster mixed with displacement effect in Adobe Photoshop CS5
Using the Free Transform (Ctrl+T) command, let’s incline a little the line, the same way shown on the next picture.
Design a Stylish Poster mixed with displacement effect in Adobe Photoshop CS5
Applying the same method, it’s possible to create the next line of the color #E27FC4.
Design a Stylish Poster mixed with displacement effect in Adobe Photoshop CS5
Insert the mask on each layer with line by choosing Add layer mask on the bottom part of the Layers panel and choose the Soft Round brush of black color.
Design a Stylish Poster mixed with displacement effect in Adobe Photoshop CS5
Use this brush to paint in the mask to hide the lines’ edges.
Design a Stylish Poster mixed with displacement effect in Adobe Photoshop CS5
Make copies of both layers containing the lines and choose the Free Transform (Ctrl+T) command to turn over the copies’ layers, placing them as it is shown below. Place the layers under the girl’s layer.
Design a Stylish Poster mixed with displacement effect in Adobe Photoshop CS5
Next step we’ll download set of brushes for Adobe Photoshop, named: Splat Brushes.
Create a new layer and use the next brushes from Splat Brushes set.
Design a Stylish Poster mixed with displacement effect in Adobe Photoshop CS5
Add some brushstrokes with the next colors: #DFA63D, #5CC1AA, #952941, #A34057, #3C7075. Place the layers with the brushes under the girl’s layer.
Design a Stylish Poster mixed with displacement effect in Adobe Photoshop CS5
Create now a new layer and fill it with white color using the Paint Bucket Tool (G). Choose the Soft Round brush of black color and represent two spots.
Design a Stylish Poster mixed with displacement effect in Adobe Photoshop CS5
Place this layer under the girl’s one.
Design a Stylish Poster mixed with displacement effect in Adobe Photoshop CS5
Select for the layer with the brushes the next filter Filter>Pixelate>Color Halftone.
Design a Stylish Poster mixed with displacement effect in Adobe Photoshop CS5
We’ve got the next result:
Design a Stylish Poster mixed with displacement effect in Adobe Photoshop CS5
Set the Blending mode for this layer to Darken.
Design a Stylish Poster mixed with displacement effect in Adobe Photoshop CS5
Create a new layer again and use the Paint Bucket Tool (G) to fill it with #052C52 color.
Design a Stylish Poster mixed with displacement effect in Adobe Photoshop CS5
Insert the mask on the layer by choosing Add layer mask on the bottom part of the Layers panel and use then Filter>Render>Clouds.
Design a Stylish Poster mixed with displacement effect in Adobe Photoshop CS5
Now we have to paint in the mask (where we’ve used Filter>Render>Clouds) with Soft Round brush of black color (set Opacity to 20% in Options bar) to hide the next zones the same way demonstrated below:
Design a Stylish Poster mixed with displacement effect in Adobe Photoshop CS5
Let’s create a new layer now and apply here the Paint Bucket Tool (G) to fill the layer with #101010 color.
Design a Stylish Poster mixed with displacement effect in Adobe Photoshop CS5
Insert the mask on the layer by choosing Add layer mask on the bottom part of the Layers panel and use then Filter>Render>Clouds.
Design a Stylish Poster mixed with displacement effect in Adobe Photoshop CS5
Above the previous layer we have to create a new one. Select both layer in Layers panel by pressing CTRL button and then press CTRL+E to Merge Down. Insert on this layer the mask (Add layer mask) and press CTRL+I to Inverse the color.
Design a Stylish Poster mixed with displacement effect in Adobe Photoshop CS5
Using the Rectangular Marquee Tool (M) represent a selection in the mask.
Design a Stylish Poster mixed with displacement effect in Adobe Photoshop CS5
Right-click inside the selection and choose Transform Selection to incline this area on the left side on 45 degrees. We have to represent three zones of the same kind inside of which we have to paint using Soft Round brush of white color to clean out the zones in the mask.
Design a Stylish Poster mixed with displacement effect in Adobe Photoshop CS5
We’ve got the next result:
Design a Stylish Poster mixed with displacement effect in Adobe Photoshop CS5
Now we have to paint in the mask containing three inclines lines with Soft Round of black color (Opacity20%) to hide the edges of the lines the same way demonstrated next picture.
Design a Stylish Poster mixed with displacement effect in Adobe Photoshop CS5
Make a copy of the last made layer and paint in the mask the lines, applying the same brush but using different value for Opacity.
Set the Blending mode for this layer to Linear Light.
Design a Stylish Poster mixed with displacement effect in Adobe Photoshop CS5
Make one more copy of the last made layer.
Design a Stylish Poster mixed with displacement effect in Adobe Photoshop CS5
Create a new layer and represent here the next selection with the Rectangular Marquee Tool (M). Incline the selection on 45 degrees too and fill this area with black color, using in this case the Paint Bucket Tool (G).
Design a Stylish Poster mixed with displacement effect in Adobe Photoshop CS5
Set Fill to 0% for this layer and click on Add a layer style icon from bottom part of the Layers panel and select Inner Shadow.
Design a Stylish Poster mixed with displacement effect in Adobe Photoshop CS5
Add Inner Glow
Design a Stylish Poster mixed with displacement effect in Adobe Photoshop CS5
We’ve got the next result:
Design a Stylish Poster mixed with displacement effect in Adobe Photoshop CS5
[ ... ]

On Facebook

Subscribe via email

Enter your email address:

Delivered by FeedBurner

Elips Computer Info